时隔十个月,今天再次来分享项目中使用到的自定义View,话不多说,直接开始,主要在相机预览的时候点击预览界面对焦时使用,并增加了对焦动画,可调节曝光。可以设置曝光的上限和下限,用于调整曝光时回调,点击后无操作5秒后隐藏。总的来说就是这些,下面开始上代码
对焦框
1
2
3
4
5
6
7
8
9
10
11
12
13
14
15
16
17
18
19
20
21
22
23
24
25
26
27
| override fun onMeasure(widthMeasureSpec: Int, heightMeasureSpec: Int) {
super.onMeasure(widthMeasureSpec, heightMeasureSpec)
val width = MeasureSpec.getSize(widthMeasureSpec)
val height = MeasureSpec.getSize(heightMeasureSpec)
frameRadius = width / 5f
frameRectF.left = (width / 2f) - frameRadius
frameRectF.right = (width / 2f) + frameRadius
frameRectF.top = (height / 2f) - frameRadius
frameRectF.bottom = (height / 2f) + frameRadius
_14 = frameRectF.height() / 4f
}
override fun onDraw(canvas: Canvas?) {
super.onDraw(canvas)
canvas?.apply {
val points = floatArrayOf(
frameRectF.left, frameRectF.top, frameRectF.left, frameRectF.top + _14,
frameRectF.left, frameRectF.top, frameRectF.left + _14, frameRectF.top,
frameRectF.left, frameRectF.bottom, frameRectF.left, frameRectF.bottom - _14,
frameRectF.left, frameRectF.bottom, frameRectF.left + _14, frameRectF.bottom,
frameRectF.right, frameRectF.top, frameRectF.right, frameRectF.top + _14,
frameRectF.right, frameRectF.top, frameRectF.right - _14, frameRectF.top,
frameRectF.right, frameRectF.bottom, frameRectF.right, frameRectF.bottom - _14,
frameRectF.right, frameRectF.bottom, frameRectF.right - _14, frameRectF.bottom)
drawLines(points, framePaint)
}
}
|
这个对焦框显而易见,其实就是画了八条线,_14是用来控制边框线条的长度的,想要边框间距更近一些,就改成
_14 = frameRectF.height() / 3f
小太阳
1.按住显示的直线
1
2
3
4
5
6
7
8
9
10
11
12
13
14
15
16
17
18
19
20
21
22
23
24
25
26
27
28
29
30
31
32
33
34
35
36
37
38
39
40
41
42
43
44
45
46
| override fun onDraw(canvas: Canvas?) {
super.onDraw(canvas)
canvas?.apply {
if (showLine) {
if (circleY != circleRadius + dp8) {
drawLine(centerOfCircle, 0f, centerOfCircle, (height * progress) - (circleRadius) - dp10, sunPaint)
}
if (circleY != height - (circleRadius) - dp8) {
drawLine(centerOfCircle, (height * progress) + (circleRadius) + dp10, centerOfCircle, height * 1f, sunPaint)
}
}
}
}
@SuppressLint("ClickableViewAccessibility")
override fun onTouchEvent(event: MotionEvent?): Boolean {
event?.let { ev ->
when (ev.action) {
MotionEvent.ACTION_DOWN -> {
if (circleY < 0f) {
circleY = height * progress
lastCircleY = circleY
}
posY = event.y
paintColor = Color.WHITE
}
MotionEvent.ACTION_MOVE -> {
curPosY = event.y
paintColor = Color.WHITE
if ((curPosY - posY > 0) || (curPosY - posY < 0)) {
showLine = true
invalidate()
}
}
MotionEvent.ACTION_UP, MotionEvent.ACTION_CANCEL -> {
showLine = false
invalidate()
}
else -> {
}
}
}
return true
}
|
直线受showLine影响显示或隐藏,showLine会在手指移动的时候会修改为true,这个时候就会显示小太阳后的直线;circleY是记录小太阳y轴的位置,而(circleY != circleRadius + dp8)是用来判断当前小太阳是否处于最上方,如果不是的话,就会绘制小太阳上方的直线,(circleY != height - (circleRadius) - dp8)同理,判断是否处于最下方。
2.小太阳外部
1
2
3
4
5
6
7
8
9
10
11
12
13
14
15
16
17
18
19
20
21
22
23
24
25
26
27
28
| override fun onDraw(canvas: Canvas?) {
super.onDraw(canvas)
canvas?.apply {
drawCircle(centerOfCircle, height * progress, circleRadius, sunPaint)
for (i in 0 until 8) {
val startPointF = calculationPoint(angle - (i * 45f), circleRadius + dp3)
val endPointF = calculationPoint(angle - (i * 45f), circleRadius + dp5)
borderWidth = 5f
sunPaint.strokeWidth = borderWidth
canvas.drawLine(startPointF.x, startPointF.y, endPointF.x, endPointF.y, sunPaint)
borderWidth = 3f
}
}
}
private fun calculationPoint(angle: Float, radius: Float): PointF {
val x = (centerOfCircle) + (radius) * cos(angle * Math.PI / 180f).toFloat()
val y = (height * progress) + (radius) * sin(angle * Math.PI / 180f).toFloat()
return PointF(x, y)
}
|
画空心圆没啥好说的,height * progress其实意义上也就是circleY。至于小太阳上下滑动外部线条也跟着转是不断改变angle,从线条最上面移动到最下面,就是从0到360的变化。不断的改变角度,达到根据手指移动旋转的效果。
3.小太阳内部
1
2
3
4
5
6
7
8
9
10
11
12
13
14
15
16
17
18
19
20
21
22
23
24
25
26
27
28
29
30
31
32
33
34
35
36
| override fun onDraw(canvas: Canvas?) {
super.onDraw(canvas)
canvas?.apply {
if (realProcess < .5f) {
val left = centerOfCircle - (((circleRadius - dp2) * 2f) * abs(realProcess - 0.5f))
val top = (height * progress) - (circleRadius - dp2)
val right = centerOfCircle + (((circleRadius - dp2) * 2f) * abs(realProcess - 0.5f))
val bottom = (height * progress) + (circleRadius - dp2)
drawOval(left, top, right, bottom, moonPaint)
drawArc(centerOfCircle - (circleRadius - dp2), (height * progress) - (circleRadius - dp2),
centerOfCircle + (circleRadius - dp2), (height * progress) + (circleRadius - dp2),
90f, 180f, false, moonPaint)
} else if (realProcess == .5f) {
drawArc(centerOfCircle - (circleRadius - dp2), (height * progress) - (circleRadius - dp2),
centerOfCircle + (circleRadius - dp2), (height * progress) + (circleRadius - dp2),
90f, 180f, false, moonPaint)
} else {
val save = saveLayer(null, null)
val left = centerOfCircle - (((circleRadius - dp2) * 2f) * abs(realProcess - 0.5f))
val top = (height * progress) - (circleRadius - dp2)
val right = centerOfCircle + (((circleRadius - dp2) * 2f) * abs(realProcess - 0.5f))
val bottom = (height * progress) + (circleRadius - dp2)
drawArc(centerOfCircle - (circleRadius - dp2 - 1), (height * progress) - (circleRadius - dp2 - 1),
centerOfCircle + (circleRadius - dp2 - 1), (height * progress) + (circleRadius - dp2 - 1),
90f, 180f, false, moonPaint)
moonPaint.xfermode = porterDuffDstOut
drawOval(left, top, right, bottom, moonPaint)
moonPaint.xfermode = null
restoreToCount(save)
}
}
}
|
小太阳中间的月亮效果是参考了蹭中秋热度来了~Android 自定义View——月有阴晴圆缺这个文章,感兴趣的可以去看一下。总的来说,这个月亮主要分为三个部分,残月 > 下弦月 > 张弦月。
残月和张弦月的原理是画了一个下弦月,在下弦月的基础上,再画一个椭圆,这个椭圆是高度和下弦月相同,宽度动态向两边延伸的。椭圆的效果如下:

这里放大了整个View,也是为了更加直观的看到椭圆的变化。看到这里就可以明白张弦月其实就是这个椭圆和下弦月叠放在一起的效果,那残月是如何实现的呢,这里用到了PorterDuffXfermode,对于PorterDuffXfermode不了解的可以看下Google的官方文档,文章中用到的是DST_OUT,效果如图:
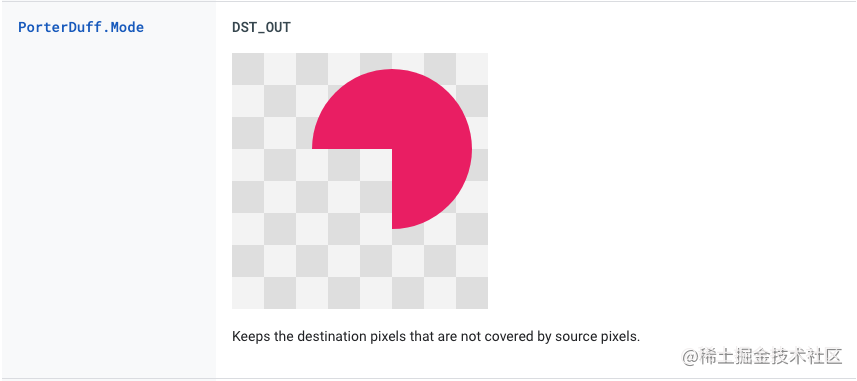
使用PorterDuff.Mode.DST_OUT将可变化的椭圆和下弦月叠放在一起就实现了残月的效果。
总结
到这里就结束了,那么如何使用呢,代码如下,首先是xml:
1
2
3
4
5
6
7
8
9
10
11
12
13
14
15
16
17
18
19
20
21
22
| <androidx.constraintlayout.widget.ConstraintLayout xmlns:android="http://schemas.android.com/apk/res/android"
xmlns:app="http://schemas.android.com/apk/res-auto"
xmlns:tools="http://schemas.android.com/tools"
android:layout_width="match_parent"
android:layout_height="match_parent"
tools:context=".MainActivity">
<View
android:id="@+id/preview_view"
android:layout_width="match_parent"
android:layout_height="match_parent"
android:background="@color/black" />
<com.lazyiones.focussunview.FocusSunView
android:id="@+id/focus_sun_view"
android:layout_width="120dp"
android:layout_height="140dp"
android:visibility="invisible"
app:layout_constraintStart_toStartOf="@+id/preview_view"
app:layout_constraintTop_toTopOf="@+id/preview_view" />
</androidx.constraintlayout.widget.ConstraintLayout>
|
这里一定要把visibility设置为invisible,不然第一次显示无法正常处理宽高,对焦框显示的位置会偏离,preview_view顾名思义就是预览的View。下面是Activity中:
1
2
3
4
5
6
7
8
9
10
11
12
13
14
15
16
17
18
19
20
| val focusSunView = findViewById<FocusSunView>(R.id.focus_sun_view)
findViewById<View>(R.id.preview_view).setOnTouchListener { _, motionEvent ->
when (motionEvent.action) {
MotionEvent.ACTION_DOWN -> {
focusSunView.visibility = View.VISIBLE
focusSunView.translationX = motionEvent.x - (focusSunView.width / 2f)
focusSunView.translationY = motionEvent.y - (focusSunView.height / 2f)
focusSunView.startCountdown()
}
}
return@setOnTouchListener true
}
focusSunView.setOnExposureChangeListener(object : FocusSunView.OnExposureChangeListener {
override fun onExposureChangeListener(exposure: Float) {
Log.e("FocusSunView", "onExposureChangeListener: -----------> $exposure")
}
})
|
OK,大致就是这样,有写的不好的地方欢迎指正。
源码地址
FocusSunView